
Tailscale derp服务器搭建
Tailscale玩法之内网穿透、异地组网、DERP搭建.
————云服务器derp中转服务器搭建部分
更新系统
apt update && apt upgrade安装需要的软件
apt install -y wget git openssl curl
下载 go环境
wget https://go.dev/dl/go1.21.3.linux-amd64.tar.gz安装go
rm -rf /usr/local/go && tar -C /usr/local -xzf go1.21.3.linux-amd64.tar.gz export PATH=$PATH:/usr/local/go/bin输入查询
go version输出这样说明安装成功

go version go1.21.3 linux/amd64
把GO添加到环境变量当中
echo "export PATH=$PATH:/usr/local/go/bin" >> /etc/profilesource /etc/profile让GO可以使用国内的代理源
go env -w GO111MODULE=ongo env -w GOPROXY=https://goproxy.cn,direct
开始拉取并编译derp
go install tailscale.com/cmd/derper@main进入目录
/root/go/pkg/mod/tailscale.com@v1.1.1-0.20231025001217-5f3cdaf2833c/cmd/derper

tailscale.com@v1.1.1-0.20231025001217-5f3cdaf2833c这个目录随机
找到 cert.go这个并编辑

注释掉这三行并保存

cd到这个文件夹
cd /root/go/pkg/mod/tailscale.com@v1.1.1-0.20231025001217-5f3cdaf2833c/cmd/derper
对derp进行编译
go build -o /etc/derp/derpercd 回到根目录

查询是否存在
ls /etc/derp自签一个域名用来启动derper,这个域名可以自己瞎编一个。
openssl req -x509 -newkey rsa:4096 -sha256 -days 3650 -nodes -keyout /etc/derp/derp.myself.com.key -out /etc/derp/derp.myself.com.crt -subj "/CN=derp.myself.com" -addext "subjectAltName=DNS:derp.myself.com"
输入命令并启动derper
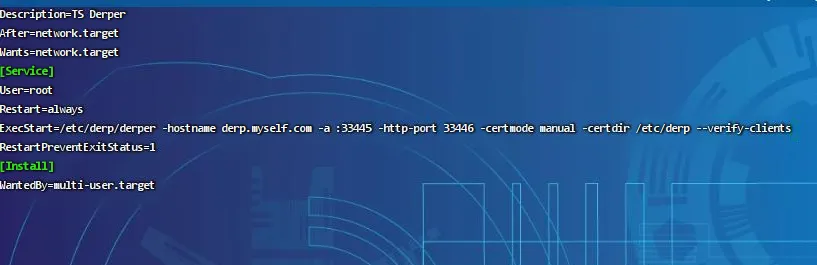
cat > /etc/systemd/system/derp.service <<EOF
[Unit]
Description=TS Derper
After=network.target
Wants=network.target
[Service]
User=root
Restart=always
ExecStart=/etc/derp/derper -hostname derp.myself.com -a :33445 -http-port 33446 -certmode manual -certdir /etc/derp
RestartPreventExitStatus=1
[Install]
WantedBy=multi-user.target
EOF
开启自启动derper服务
systemctl enable derp启用derper服务
systemctl start derp

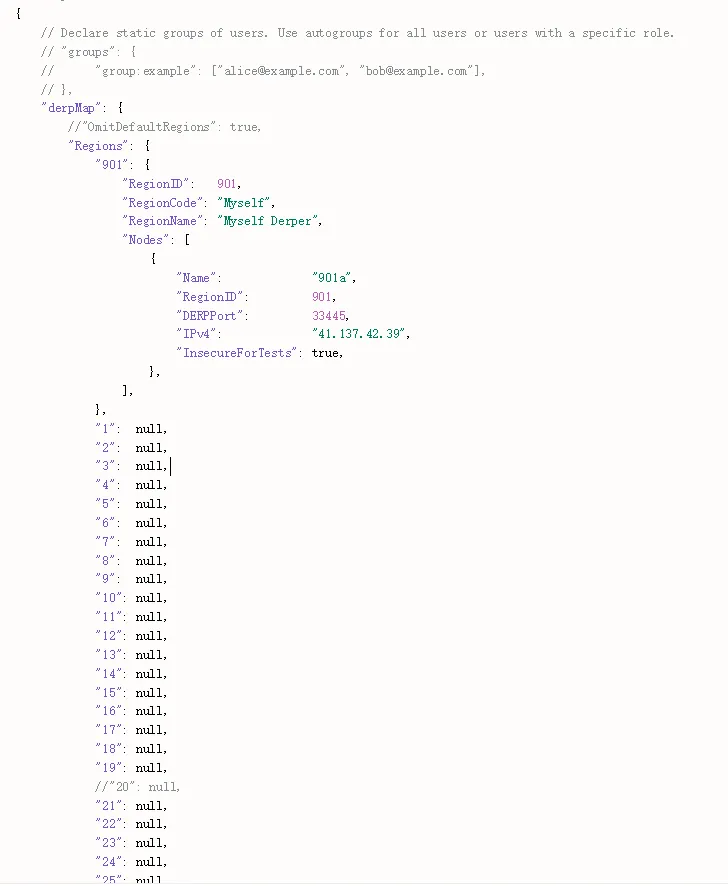
去 https://login.tailscale.com/admin/acls/file 修改添加
"derpMap": {
		//"OmitDefaultRegions": true,
		"Regions": {
			"901": {
				"RegionID":   901,
				"RegionCode": "Myself",
				"RegionName": "Myself Derper",
				"Nodes": [
					{
						"Name":             "901a",
						"RegionID":         901,
						"DERPPort":         33445,
						"IPv4":             "服务器IP",
						"InsecureForTests": true,
					},
				],
			},
			"1":  null,
			"2":  null,
			"3":  null,
			"4":  null,
			"5":  null,
			"6":  null,
			"7":  null,
			"8":  null,
			"9":  null,
			"10": null,
			"11": null,
			"12": null,
			"13": null,
			"14": null,
			"15": null,
			"16": null,
			"17": null,
			"18": null,
			"19": null,
		  //"20": null,
			"21": null,
			"22": null,
			"23": null,
			"24": null,
			"25": null,
		},
	},
查询derper服务状态
tailscale netcheck
查看
tailscale status
PING Tailscale的机子IP,并查看是否连接DERPER服务器等状态
tailscale ping
关闭 Tailscale
tailscale down
打开Tailscale
tailscale up
保护Tailscale的derper服务的安全
安装Tailscale
curl -fsSL https://tailscale.com/install.sh | sh
国内手动安装:
下载地址:https://dl.tailscale.com/stable/tailscale_1.56.1_amd64.deb
上传到root目录后命令安装:
sudo dpkg -i tailscale_1.54.1_amd64.deb打开Tailscale,正常加入
tailscale up
修改derper服务
nano /etc/systemd/system/derp.service
在这行后面添加
--verify-clients
加载服务
systemctl daemon-reload
重启服务
systemctl restart derp
————改善github下载速度慢的解决方案
下面代码可以放到/etc/hosts文件的末尾,然后重启云服务器就可以
20.205.243.166 github.com
20.205.243.166 gist.github.com
185.199.110.133 assets-cdn.github.com
185.199.111.133 raw.githubusercontent.com
185.199.110.133 gist.githubusercontent.com
185.199.110.133 cloud.githubusercontent.com
185.199.110.133 camo.githubusercontent.com
185.199.110.133 avatars0.githubusercontent.com
185.199.110.133 avatars1.githubusercontent.com
185.199.110.133 avatars2.githubusercontent.com
185.199.110.133 avatars3.githubusercontent.com
185.199.110.133 avatars4.githubusercontent.com
185.199.110.133 avatars5.githubusercontent.com
185.199.110.133 avatars6.githubusercontent.com
185.199.110.133 avatars7.githubusercontent.com
185.199.110.133 avatars8.githubusercontent.com
不过需要注意,ip可能之后需要更新,可以去站长工具,ping后面的域名来获取。